Let’s be real: managing curly hair can feel like a fight you didn’t sign up for. Tangled strands, frizz that shows up uninvited, and curls that don’t curl quite the way they should—it’s frustrating. If you’ve ever ditched your blow dryer out of fear it’ll turn your curls into a tumbleweed, you’re not alone. But …
Step-by-Step Guide Using a Hair Diffuser for Gorgeous Curls
Let’s be real: managing curly hair can feel like a fight you didn’t sign up for. Tangled strands, frizz that shows up uninvited, and curls that don’t curl quite the way they should—it’s frustrating. If you’ve ever ditched your blow dryer out of fear it’ll turn your curls into a tumbleweed, you’re not alone. But here’s the deal: the tool isn’t the enemy. It’s about how you use it. And when it comes to curly hair? The right tool makes a world of difference.
That’s where the diffuser comes in.
A diffuser is like the secret sauce for curly hair—a game-changer when you’re looking for definition, not damage. You’ll get enhanced curls, less frizz, more volume, and faster drying time without sucking the life out of your strands.
This guide’s not just about slapping a diffuser on your dryer and hoping for the best. We’re digging into a full-on, easy-to-understand walk-through—from getting your hair ready to dialing in pro-level techniques. Whether you’re learning to love your curls or just looking for better results, this one’s for you.
Why A Hair Diffuser Is Essential For Curly Hair Care
If you’ve ever tried to dry curly hair the “normal” way—aka full blast with a standard nozzle—you’ve probably ended up looking like you lost a battle with humidity. Here’s why the diffuser deserves a permanent spot in your hair toolkit.
Definition And Functionality Of A Hair Diffuser
So what actually is a diffuser, and why should you care?
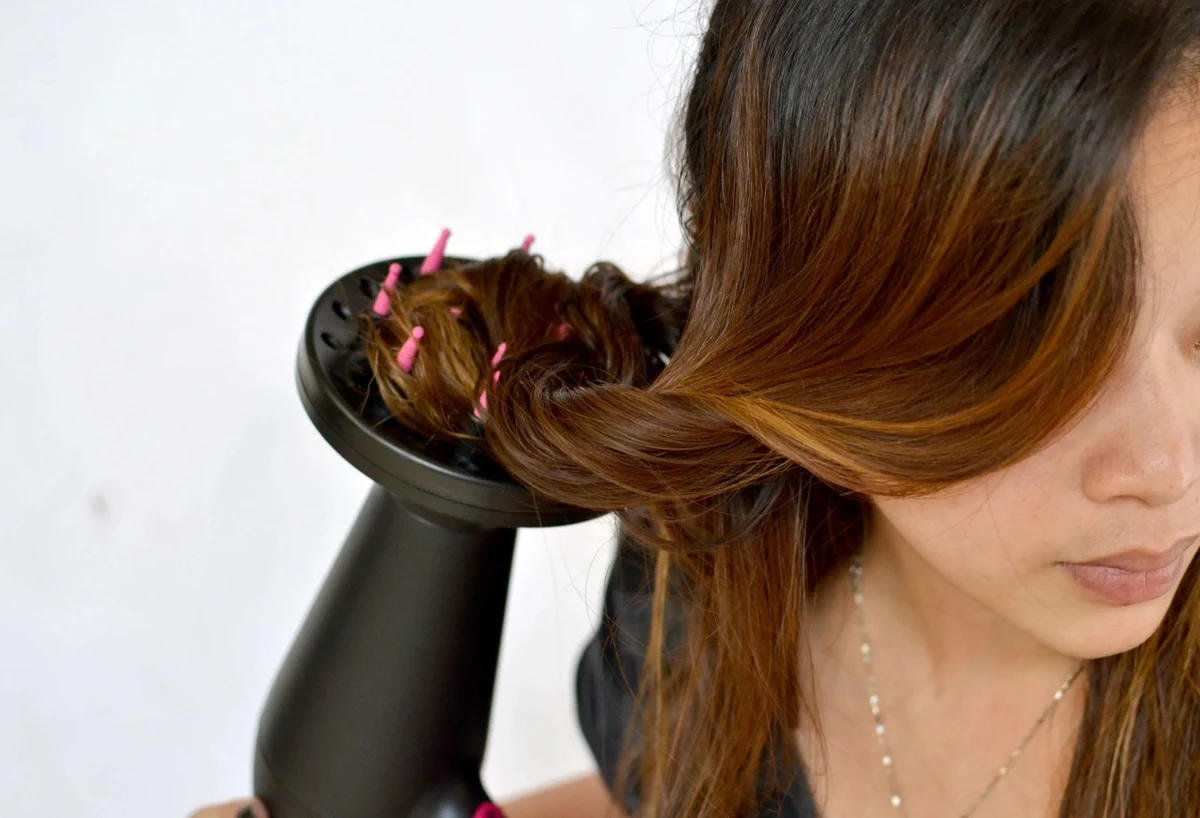
A diffuser is an attachment that fits onto your blow dryer. Instead of blasting high-speed air directly onto your hair, it spreads the airflow across a wider area. Think of it like switching from a high-pressure hose to a gentle mist.
And the design isn’t random. Most diffusers have a bowl shape with prongs or fingers that support your curls and lift them at the roots while drying. The result? Heat control, less direct pressure, and better shape retention.
| Standard Blow Dryer | Hair Diffuser |
|---|---|
| High-speed, direct airflow | Even, diffused heat distribution |
| More frizz and disturbance | Reduces frizz and protects pattern |
| Can flatten curl shape | Lifts and defines curls softly |
Top Benefits Of Using A Diffuser For Curly Hair
Here’s where things get interesting.
Using a diffuser isn’t just a stylist’s secret—it’s packed with legit benefits:
- Frizz Reduction: Diffusers distribute air more evenly, which cuts down frizz and gives curls a smoother finish.
- Curl Enhancement: Lifted roots and supported strands mean your natural curl pattern stays defined without weighing down.
- Volumized Look: Want gravity-defying bounce? Turn your head upside down while diffusing, and watch the volume punch in.
- Less Heat Damage: Since the airflow is less intense, you can dry faster with less risk of frying your strands.
According to [NaturallyLinked](https://www.naturallylinked.com/post/the-benefits-of-using-a-diffuser-for-curly-hair-enhancing-your-natural-curls?utm_source=openai), working with your hair instead of against it is the key to enhancing what you’ve already got. A diffuser helps you do just that—effortlessly.
Diffuser Vs Air Drying For Curls: A Comparison
Now you might be thinking, “Can’t I just let my hair air dry?” Sure you can. But know this—it won’t look the same.
Air drying takes longer, often causes uneven drying (leading to that oddly squishy spot at the nape), and doesn’t do much to lift your roots. Also, the longer your hair stays wet, the more likely it is to soak in humidity and puff up like cotton candy.
The diffuser wins on:
– Time: Curls dry faster, and that’s less time for them to fall flat or get disturbed.
– Shape: You keep those spirals tight and defined—for real.
– Control: You can flip, lift, pause, rotate… you’re in charge, not the weather.
Bottom line: If you want more control over how your curls look and feel, the diffuser isn’t optional—it’s essential.
Prepping Your Hair For Diffusing
If your curls are the canvas, prep is the primer. Jumping into diffusing without getting your hair ready is like painting on a dirty wall—won’t end well. Here’s how to set yourself up for flawless curls.
Start With Clean, Wet Hair
A successful diffusing session starts in the shower. Clean hair helps your styling products do their job, and hydration gives you the moisture curls thrive on.
After rinsing, resist the urge to towel-dry aggressively. You want “wet” hair here—not just damp. Styling on wetter strands helps lock in curl shape with less frizz.
Choose The Right Styling Products
This is your power-up phase.
Stack up your routine with products built for hold, hydration, and heat defense:
– Use a lightweight leave-in conditioner for slip and moisture.
– Layer on a curl cream or mousse to build shape and texture.
– Seal it with a gel if you want a stronger cast (the crunchy coating that gets scrunched out later).
– Don’t skip heat protectant spray—it’s your insurance policy.
Each product you apply becomes part of your curl definition. Think of them like scaffolding holding your curls up as they dry.
Drying Prep: Removing Excess Water
Grab a microfiber towel or an old cotton T-shirt (yes, really). Skip the rough terry cloth—it creates friction, which kills curl definition.
Here’s the move:
- Scrunch upward toward your scalp to lift curls while soaking up extra moisture.
- Don’t overdo it. You’re not trying to make your hair dry—just less drippy.
- Hands off afterward. Once you’ve applied products and scrunched, keep fingers out to avoid frizz.
Now you’ve got curls that are clean, hydrated, product-loaded, and ready to meet the diffuser. This is the foundation for definition that lasts all day. And the good news? Every part of this process is totally learnable. Just takes practice—and maybe a few missteps—to find your rhythm.
Step-by-Step Hair Diffuser Tutorial for Natural, Bouncy Curls
Ever wondered why your curls never quite look salon-ready after blow-drying? If your curls are left frizzy, flat, or undefined, a diffuser might be the missing puzzle piece. Learning how to use a hair diffuser for curly hair isn’t about adding more steps—it’s about doing each one right.
Attaching the Diffuser to Your Hair Dryer
Not all diffusers play nice with every hair dryer, so make sure you’re using one that fits snugly. A universal diffuser is the safest bet—it usually works with most standard barrel dryers. Once attached, give it a gentle twist to make sure it’s on tight. A loose-fitting diffuser can pop off mid-dry, and that’s no one’s idea of a good hair day.
Whether you’re using something fancy like the Diva Pro Styling XXL or a basic drugstore model, if it clicks and stays put, you’re golden.
Select the Best Diffuser Settings for Curly Hair
Heat is not your curl’s best friend—consider it more of a frenemy. Too much of it invites damage, frizz, and lost definition. Flip your dryer to low or medium heat and stick with a low-speed airflow. This mimics air-drying but speeds up the process.
Lower settings give the diffuser time to work its magic without blasting your curls apart.
Sectioning and Positioning
Trying to diffuse your whole head at once? It’s like cooking a steak on high heat—it might look done outside, but inside? Not so much.
Split your hair into smaller sections before you start. That way, each curl family gets the attention it deserves. It doesn’t have to be perfect—clipping the hair loosely into four to six parts does the trick. Then, for major lift, flip your head upside-down or tilt it side to side as you work.
Start Diffusing: Hands-On Techniques
Time to dry—this is all about gentle technique. Place a section of curls into the diffuser bowl and slowly lift it toward the scalp. Don’t mash it in—just a gentle lift.
- Hover the diffuser near the scalp to dry roots without overheating.
- Keep it still until the section feels mostly dry—constant movement equals frizz.
- Switch angles as you go to hit all sides evenly.
One stylist describes it like “cupping your curls in a warm hand.” That image makes it super easy to remember: Don’t disturb the curl—support it.
Timing and Finishing Touches
Don’t dry until bone-dry. Stop at the 80–90% mark. Letting the last bit air-dry locks in moisture and avoids the dry, crunchy feel. Once everything is set, go in with clean, dry hands.
Gently scrunch the curls—that breaks the crunchy cast left by styling gel or mousse and reveals soft, bouncy curls underneath. It’s the moment your curls go from “wet look” to red carpet-ready.
Advanced Techniques for Mastering the Diffuser Drying Method
Once you’ve got the basics of how to use a hair diffuser for curly hair, dialing up the results with a few pro-level tweaks can give you volume, shine, and definition that lasts all day—even on second or third-day hair.
Root Volume Tips Using a Diffuser
For flat roots? Try flipping your hair upside-down and holding the diffuser close to the scalp, right at the roots. Just don’t press into your head—hover to avoid over-drying one area.
A stylist trick: Let your curls cool off in that flipped position. This sets the root lift in place while avoiding gravity’s pull.
Creating Defined, Long-Lasting Curls
If curl definition fades after drying, it might be time to add in a little “micro-plopping” before you pick up the dryer. After products go in, wrap your curls gently in a microfiber towel or T-shirt to “set” them before diffusing.
And when diffusing, use the diffuser fingers to gently lift and separate curls. This encourages your natural pattern to form and stay locked in longer.
Experimenting with Angles and Postures for Even Drying
One issue many overlook? The way you’re holding that dryer. If you always point it the same way, the back of your head might stay damp.
Switch it up:
- Look down and diffuse the crown at the back.
- Lean sideways to get right behind your ears.
- Twist your wrist to angle the bowl in new directions.
Confidence in your curls starts with even drying—every angle counts.
Innovative Beauty Tools Designed for Curly Hair
Let’s talk tools. The wrong diffuser can turn bombshell curls into a frizz storm. The best ones are designed with curly hair in mind—big bowls, thoughtful design, and even a bit of tech inside.
Key Features to Look for in Diffuser Attachments
A smart buy starts with the build. Curly-focused diffusers should have:
- A wide bowl to capture more curls without smooshing them.
- Long prongs to reach the roots while supporting volume.
- Adjustable airflow for versatility with drying times.
Bonus points for attachments that stay in place and don’t rattle while drying.
Recommended Diffuser Products for Curly Hair
The Diva Pro Styling XXL Diffuser is a heavy hitter—oversized bowl, tons of prongs, fits most dryers. It’s the go-to for long, thick curls that need space to breathe.
The ghd Professional Diffuser adds polish with strategic prong spacing and a surface built for curl definition—not disruption.
Tech-Enhanced Diffusers
Hair tech is leveling up. Ionic and ceramic diffusers now help seal the hair cuticle while you dry. That means less frizz, more shine, and curls that behave better through humidity.
If you’re investing in a new dryer altogether, look for models with built-in ionic or ceramic tech—it’s worth the upgrade if frizz is your arch-enemy.
Common Diffuser Mistakes and How to Avoid Them
Ever finished diffusing your hair only to end up with a frizzy, undefined mess? Yeah, been there. The truth is, the diffuser isn’t the problem—it’s how you’re using it. Let’s break down the most common mistakes people make when figuring out how to use a hair diffuser for curly hair, and how to dodge those landmines for good results.
Using High Heat and Speed Settings
Cranking up the heat seems faster, right? Except it’s sabotaging your curls. High heat + curly hair = frizz, breakage, and sad, limp curls. Direct heat warps the curl pattern and dries out your strands to the point of no return.
Low and slow wins. Stick to a low speed and heat setting. The airflow stays gentle, the curls stay hydrated, and you don’t fry your hair to a crisp. Hairstylist Jonathan Colombini even swears by this, saying it’s the best way to protect your definition while keeping your strands intact.
Frequently Moving the Diffuser
Bouncing the diffuser all over your head doesn’t just waste time—it wrecks your definition. You know that bounce-back curl you’re chasing? It needs stability to form. When you constantly move the diffuser, you’re breaking up the curl clumps and stirring up frizz before the hair gets a chance to set.
Instead, load a section of curls into the diffuser bowl, press it gently toward your scalp, and hold. Let that section dry before moving to the next. It’s boring, but it works. Think of it like baking a cake—leave it alone and let the heat do its job.
Touching Curls During Drying
You probably do this without even noticing—raking your fingers through your hair mid-diffuse to “help” the shape along. But truthfully, that’s like poking a soufflé before it sets. You’re interrupting the curl formation and basically inviting frizz over for dinner.
Hands off, folks. Let the product cast harden, let your curl shape set, and only touch once you’re scrunching out the crunch at the very end. That’s when the magic happens. Until then, patience pays off.
Diffuser Maintenance and Care Tips
Let’s be real. That hair diffuser attachment you toss in a drawer after every wash? It needs TLC too. Proper care ensures it doesn’t turn into a product-glued mess or crack just when you need it most.
Cleaning Your Hair Diffuser
Gunky product buildup clogs airflow and messes with heat distribution. That equals patchy drying and weak definition. Fix is simple:
- Detach diffuser after use
- Run it under warm water
- Use mild soap and a soft brush (even an old toothbrush)
- Rinse and towel dry thoroughly before storing
Make this a weekly habit and your diffuser—and curls—will thank you.
Ensuring Longevity of Your Diffuser
Storage matters. Tossing your diffuser in with random hot tools leads to cracks and warping. Instead:
Store it in a dry cabinet with your hair tools, and keep the prongs from being smashed under heavy dryers. Also, check your diffuser’s compatibility with your blow dryer model. Forcing a fit can break the connection or your device.
Diffuser Benefits for Enhancing Natural Curl Patterns
You don’t have to choose between healthy curls and stylish ones. Using a diffuser bridges that gap and actually improves the look and feel of your hair over time.
Impact on Curl Health and Appearance
I get it—air drying takes forever, and traditional drying tools often blast your curls into submission. But when you learn how to use a hair diffuser for curly hair the right way, you protect your texture instead of masking it. Diffusing reduces the need for flat irons, curlers, or excessive brushing. That means fewer split ends and better curl memory over time.
Healthy curls = defined curls. By diffusing, your strands get even heat, reduced friction, and time to “cast” into bouncy spirals without being disturbed. It becomes less about fighting your hair and more about working with it.
Flexible Styling Options Using a Diffuser
Here’s where it gets fun. A diffuser isn’t a one-trick pony. Fact is, you can dial in a dozen looks based on how you dry and style:
- For soft, beachy waves: use curl foam, scrunch upward, cup wide sections into the diffuser, and stop at 70% dry.
- For tighter coils: finger coil or twist damp curls, then diffuse on low heat until 90% dry to lock them in.
Whether you’re hitting brunch or a black-tie wedding, your diffuser’s got range.
Professional Hair Diffuser Styling Tips to Level Up Your Curls
The pros don’t have magical hair—they just know how to play the diffuser game smarter. Here’s what really takes curls from “eh” to editorial.
What Stylists Advise for Salon-Ready Results
Lining up the right product-to-tech combo is the real secret. Stylists recommend layering your products—from leave-ins to gels—starting on soaking wet hair. This boosts hydration and hold before the diffuser even touches your curls.
Apply each product in sections and use praying hands or scrunching motions to trap in moisture. Then let the diffuser do its thing. Key is patience and precision. Don’t rush it, don’t shake it, just cup and hold.
Blending Traditional and Advanced Diffuser Techniques
Want next-level results? Mix in these stylist-approved tweaks:
- Hover-drying: Hold the diffuser near curls without touching for a gentler finish.
- Upside-down diffusing: Flip your head to build volume at the roots.
- Pineapple drying: Clip curls up at the crown mid-diffusing to stretch and shape strands.
Blend these with the basics, and suddenly you’re not just drying—you’re sculpting.
Final Thoughts and Easy Diffuser Hair Care Routine
This isn’t about copying someone else’s curls. It’s about dialing in what works for you and sticking with it until it becomes second nature.
Creating Your Customized Routine
Fine curls? Use lighter products and shorter dry times. Coily hair? Go richer with creams and finish with oil. The goal is to find your perfect product-diffuser match and keep refining it based on how your hair feels that day.
Encouragement to Experiment with Your Diffuser
Try something new. Tilt your head differently. Diffuse without product one day. Jump on TikTok and test that diffuser hack you scrolled past. Your best curls are hiding in trial and error. Just stay curious—and hands off while drying.